By: Candace Hansen
Working in a drum shop exposed me to a lot of gear. I have seen everything from rare vintage pieces to the newest and coolest and everything in between. Over the years I assisted many customers with a multitude of projects, but there is one that stuck out to me so much that I had to do it myself: the suitcase drum kit.
Suitcase drum kits exude cool. Legend has it that early low budget touring drummers would use these things on the road so they could travel easier and faster. These drum kits are not just cool because of hipster folklore; they're actually practical and look and sound great. With stages getting smaller, smaller kits have become very practical. They are inexpensive to make, and almost everything will fit inside of the suitcase when it's collapsed making for easy transport.
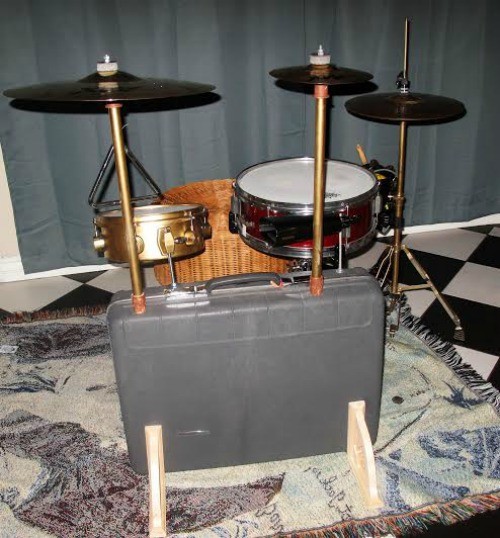
There are many ways to make these kits and many looks that can be achieved with them. I chose to construct one with a floor tom and two cymbals, but feel free to adapt to fit your own needs. Suitcase drum kits are great for a variety of people; drummers who wants to achieve a vintage look and feel but don't have the budget, singer songwriters needing something to keep a beat with, drummers who want something small and portable, and drummers who love to nerd out on their gear.
To build one of these beauties you will need…
]
Materials:
Drill, drill bits (one large and one small), pencil and or marker, Phillips screw driver, pliers, vice grips, a few hours of your favorite music to listen to.
Drum stuff you already need or need to find:
A light weight hi-hat stand, light weight snare stand, hi-hat cymbals, a splash cymbal, ride/crash cymbal, cowbell, pedal, snare, drum throne, a small piccolo or accessory tom (preferably 10in). If you already have some of these components it will cut down considerably on the price.
Things you need to buy:
-A vintage suitcase. It must be of hard material
-2 Shelf brackets. These will become your bass drum spurs.
-2 small PVC pipes (1/2 inch) cut to approximately 17 inches
-2 PVC “reducing” Male Adaptors ½ to ¾ inch. These will fasten your “cymbal stands” in place.
-2 Female PVC adaptors ½ inch. These go on the bottom of the PVC pipe cymbal stand.
-Two ¾ to ½ inch PVC “reducer bushing.” Note: these are made of plastic and will be the tops of your cymbal stand that hold on the carriage bolt and cymbal sleeve.
-2 carriage bolts with matching nuts to use as cymbal mounts.
-One door hinge. (4 inch is good) with four machine screws and nuts to fasten door hinge.
-2 cymbal sleeves
-4 or more cymbal felts
-1 large machine screw. This will be your cowbell mount. You need 2 washers and 1 nut to make this component work.
-1 threaded rod. This will be your tom mount. I used a 5/16 size and it worked well. You also need 2 nuts, 2 washers and a matching neoprene washer to complete this assembly. You may need to purchase a floor tom leg bracket to put on to a miscellaneous tom for it to mount. A good model to buy is a Pearl LB15.
-Fourteen metal washers
-Two ¾ inch neoprene rubber grommets.
How to make it!
1. First group all of the parts into small matching groups of what they are going to be used for. All stuff for cymbal stands together, all tom bracket stuff together, and all cowbell mount stuff together.
2. Clean all parts and make sure to remove all stickers from PVC material.
3. Paint all parts that you would like painted.
4. Visualize where you want to drill out the suitcase. Make sure to mark where you want to drill in pencil before you drill. You will need to drill holes for:
2 cymbal stand holes.
1 tom mount hole.
1 cowbell mount hole.
4 holes for the bass drum mount door hinge.
2 small holes per bass drum spur.
5. Building the bass drum mount: Install the door hinge. It should be fastened to the bottom of the suitcase and held by 4 machine screws with nuts on the opposite side. To ensure this is permanently connected use a vice grip and screwdriver to tighten. Double check that the door hinge is centered and on the “batter side” of the suitcase.
6. Next put on the tom and cowbell mounts.
Cowbell: Use one large machine screw for the cowbell mount. Drill out a space just large enough for this then thread it through the plastic. Put a washer on both the top and bottom side before securing thoroughly with a nut.
Floor tom mount: Take the 5/16th-threaded rod and drill plastic to fit exact. Thread through and place washers on both sides. On the topside put a neoprene washer under the metal washer to prevent slippage and unscrewing.
7. Now make the cymbal stands.
Step 1: Collect 12 washers, 2 PVC pipes, 2 male PVC adaptors, 2 female PVC adaptors, 2 PVC reducers, 2 cymbal sleeves, necessary felts, 2 carriage bolts and their matching nuts.
Step 2: attach female adaptors to bottoms of PVC pipe.
Step 3: Stack 4 washers on top of the PVC pipe.
Put 2 washers on top of the carriage bolt than add the reducer PVC cap so that the bolt is coming out of the top of the cap with the 2 washers in between.
Push on the reducer cap as to sandwich all of the stuff inside.
Ta-Dah! A cymbal stand is born!
Next place the cymbal sleeve, felts and a washer of your choice and top with nuts.
Repeat for second stand.
Next drill out the spaces in the suitcase for the stands. These are the most difficult holes to drill. To drill grab the “male PVC pipe adaptor” and trace the threaded diameter onto the suitcase. Then drill a hole to match this size near to exact. .
Note: Do not over drill this hole! If it is too big the cymbal stand can fall through the suitcase!
Thread the male PVC adaptor through the suitcase from the inside out. It should poke out when there is nothing attached to it.
Carefully unscrew the male adaptor and put the ¾ inch neoprene grommet at the base, then carefully screw the adaptor back into the suitcase.
To secure this piece use a vice grip when screwing it in.
These parts stay in the suitcase and will poke out of the top about an inch or so.
8. Lastly, attach the bass drum spurs (shelf brackets) to the front side of the suitcase. Drill from the inside of the suitcase.
9. Now you're done manufacturing! Setting it up should be easy from here.
Close the suitcase up and face the door hinge side towards you.
Attach a bass drum pedal to the door hinge
Screw on “cymbal stands” to their respective bases.
Put cymbals on stands.
Attach cowbell to the cowbell mount and position accordingly.
Attach accessory tom to the tom mount
Set up your snare drum, throne and hi-hat stand.
Shredding should ensue from here.
This guide to building a DIY suitcase drum kit originally appeared in Tom Tom Magazine
See also:
The 50 Best Things About the OC Music Scene
The 50 Worst Things About the OC Music Scene
The 25 Greatest OC Bands of All Time: The Complete List
Follow us on Twitter at @OCWeeklyMusic and like us on Facebook at Heard Mentality.
One Reply to “Make Your Own DIY Suitcase Drum Kit”